In this tutorial, I will explain how to integrate the Instamojo payment gateway in PHP step by step. Instamojo is an online selling platform in India that provides APIs for different languages with detailed documentation that is very easy to integrate.
The developers can integrate the payment gateways to their applications or websites with the help of the APIs provided by Instamojo in various programming languages.
After successful integration, all the payments will be done. In this tutorial.
Prerequisite:-
- PHP latest version and WAMP server should be installed.
Required steps to integrate Instamojo payment gateway in PHP
Step 1:- Sign up for the Instamojo test account.
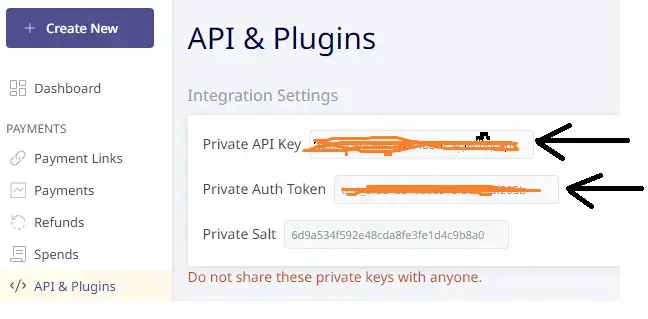
Step 2:- After the successful signup, go to the left pane of the dashboard and click on API & Plugins as shown below.
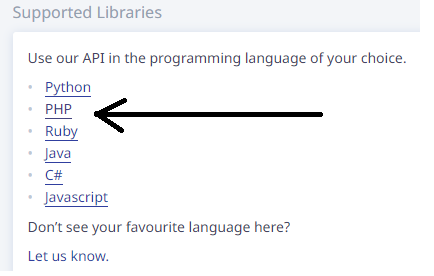
Step 3:- Click on PHP from the supported libraries as shown below.
Step 4:- Now, download the zip folder from the Github landing page. (https://github.com/Instamojo/instamojo-php) .
Step 5:- Now, create a folder name ‘instamojo’ inside the root folder i.e. www of the local server.
Step 6:- Now, extract the zip folder you have downloaded from Git hub and place it inside the instamojo folder.
Step 7:- Create a database in PHPMyAdmin and table under the database.
DDL information of the table:-
CREATE TABLEinstamojo_purchase(idint(10) unsigned NOT NULL AUTO_INCREMENT,payment_idvarchar(255) COLLATE utf8mb4_unicode_ci DEFAULT NULL,amountvarchar(255) COLLATE utf8mb4_unicode_ci DEFAULT NULL,payment_modevarchar(255) COLLATE utf8mb4_unicode_ci DEFAULT NULL,transaction_statusvarchar(255) COLLATE utf8mb4_unicode_ci DEFAULT NULL,buyer_namevarchar(255) COLLATE utf8mb4_unicode_ci DEFAULT NULL,created_attimestamp NOT NULL DEFAULT current_timestamp() ON UPDATE current_timestamp(),updated_attimestamp NOT NULL DEFAULT '0000-00-00 00:00:00',
PRIMARY KEY (id)
) ENGINE=InnoDB AUTO_INCREMENT=2 DEFAULT CHARSET=utf8mb4 COLLATE=utf8mb4_unicode_ci
Step 9:- Add the below code to index.php
index.php
<html>
<head>
<title>Payment Gateway</title>
<link rel="stylesheet" href="https://maxcdn.bootstrapcdn.com/bootstrap/3.4.1/css/bootstrap.min.css">
<style>
.container{
width:50%;
height:30%;
padding:20px;
}
</style>
</head>
<body>
<div class="container">
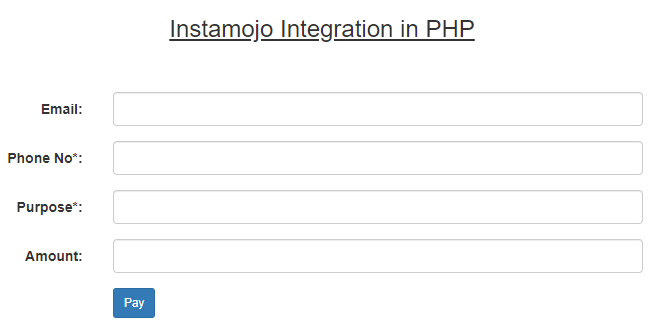
<h3 align="center"><u>Instamojo Integration in PHP</u></h3>
<br/><br/>
<form class="form-horizontal" action="pay.php" method="post">
<div class="form-group">
<label class="control-label col-sm-2" for="email">Email:</label>
<div class="col-sm-10">
<input type="email" class="form-control" name="email">
</div>
</div>
<div class="form-group">
<label class="control-label col-sm-2" for="phone">Phone No*:</label>
<div class="col-sm-10">
<input type="text" class="form-control" name="phone_no">
</div>
</div>
<div class="form-group">
<label class="control-label col-sm-2" for="email">Purpose*:</label>
<div class="col-sm-10">
<input type="text" class="form-control" name="purpose">
</div>
</div>
<div class="form-group">
<label class="control-label col-sm-2" for="pwd">Amount:</label>
<div class="col-sm-10">
<input type="text" name="amount" class="form-control">
</div>
</div>
<div class="form-group">
<div class="col-sm-offset-2 col-sm-10">
<button type="submit" class="btn btn-primary btn-sm" name="submit">Pay</button>
</div>
</div>
</form>
</div>
<!-- jQuery library -->
<script src="https://ajax.googleapis.com/ajax/libs/jquery/3.5.1/jquery.min.js"></script>
<!-- Latest compiled JavaScript -->
<script src="https://maxcdn.bootstrapcdn.com/bootstrap/3.4.1/js/bootstrap.min.js"></script>
</body>
</html>
Step 10:- Add the below code to dbconnect.php to connect to the database.
dbconnect.php
<?php
$servername='localhost';
$username="root";
$password="";
try
{
	$con=new PDO("mysql:host=$servername;dbname=test_db",$username,$password);
	$con->setAttribute(PDO::ATTR_ERRMODE,PDO::ERRMODE_EXCEPTION);
	//echo 'connected';
}
catch(PDOException $e)
{
	echo '<br>'.$e->getMessage();
}
?>
Step 11:- Add the below code to pay.php
pay.php
<?php
require 'instamojo-php-0.4/src/Instamojo.php';
//get the inputs
if(isset($_POST['submit']))
{
	   $email = $_POST['email'];
	   $phone = $_POST['phone_no'];
	   $purpose = $_POST['purpose'];
	   $amount = $_POST['amount'];
			//create the API object
		$api = new Instamojo\Instamojo('test_06edceeb256a4bda7541e6d0d66', 'test_8fed45349a6a816f577afaf205b', 'https://test.instamojo.com/api/1.1/');

		//create the payment request
		try {
		    $response = $api->paymentRequestCreate(array(
		        "purpose" => $purpose,
		        "amount" => $amount,
		        'phone'=> $phone,
		        "send_email" => true,
		        "email" => $email,
		        "redirect_url" => "http://localhost/myprojects/instamojo/success.php",
		        ));
		    /*echo '<pre>';
		    print_r($response);*/
		    $url = $response['longurl'];
		    header("location:$url");
		}
		catch (Exception $e) {
		    print('Error: ' . $e->getMessage());
		}
}

?>
Illustration of pay.php:-
- we will include the extracted zip folder in which Instamojo.php exists.
- we will fetch the inputs using the $_POST variable.
- we will create the API object as shown below
<?php
$api = new Instamojo\Instamojo('test_06edceeb256a4bda7541e6d0d66', 'test_8fed45349a6a816f577afaf205b', 'https://test.instamojo.com/api/1.1/');
?>
- we will create the payment request using the API with the help of an array as shown below
<?php
//create the payment request
		try {
		    $response = $api->paymentRequestCreate(array(
		        "purpose" => $purpose,
		        "amount" => $amount,
		        'phone'=> $phone,
		        "send_email" => true,
		        "email" => $email,
		        "redirect_url" => "http://localhost/myprojects/instamojo/success.php",
		        ));
		    echo '<pre>';
		    print_r($response);
		}
		catch (Exception $e) {
		    print('Error: ' . $e->getMessage());
		}
?>
The above code will give you a JSON object containing the details of the payment request in the form of an array as shown below.
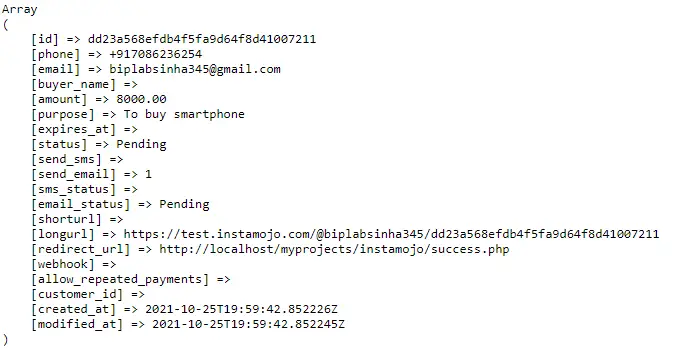
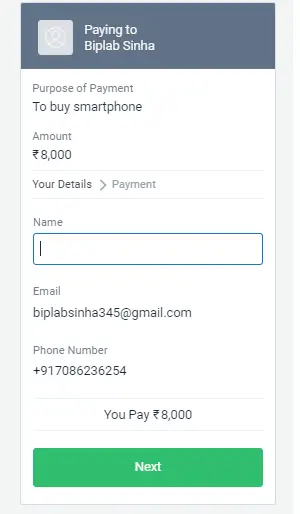
From the above array, we will use the ‘longurl’ which redirects us to the Instamojo payment page along with the payment details like purpose, email, phone, amount where we have to enter the buyer name and proceed to buy as shown below.
Step 12:- Add the below code to success.php
success.php:-
<?php
require 'instamojo-php-0.4/src/Instamojo.php';
require 'dbconnect.php';
//create the API object
$api = new Instamojo\Instamojo('test_api_key', 'test_auth_token', 'https://test.instamojo.com/api/1.1/');
//Get the status of the payment related to your payment request
try {
    $response = $api->paymentRequestPaymentStatus($_GET['payment_request_id'], $_GET['payment_id']);
    $buyer_name = $response['payment']['buyer_name'];
    $amount = $response['payment']['amount'];
    $payment_id = $response['payment']['payment_id'];
    $transaction_status = $response['payment']['status'];
    $payment_mode = $response['payment']['instrument_type'];

    if($response['payment']['status']=='Credit')
    {
        //insert the data in the database
        $sql="INSERT INTO instamojo_purchase(buyer_name,payment_id,amount,transaction_status,payment_mode)
            VALUES('$buyer_name','$payment_id','$amount','$transaction_status','$payment_mode')";
			$stmt=$con->prepare($sql);
			$stmt->execute();

	  if($stmt->rowCount()>0){

	  	 echo '<strong>Success!</strong>Your Order has placed successfully';
	  	 echo '<br>';
	  	 echo 'Payment ID:' .$payment_id.'<br>';
	  	 echo 'Buyer Name:' .$buyer_name.'<br>';
	  	 echo 'Amount:' .$amount.'<br>';
	  	 echo 'Transaction Status:' .$transaction_status;
	  }
    }
    else{

    	echo 'Failed';
    }
}
catch (Exception $e) {
    print('Error: ' . $e->getMessage());
}

?>
Illustration of the success.php
- Here, we will include the extracted zip folder in which Instamojo.php exists.
- we will the database connection file i.e. dbconnect.php because we have to enter the payment related data in the database table after successful transaction.
- Again we will create the API object using the AUTH_KEY and AUTH_TOKEN.
- Get the payment_request_id and payment_id by printing the $_GET variable on top of the success,php file as shown below. (This is just for checking)
<?php
echo <'pre>';
print_r($_GET);
?>
- Now, we will get the status of the payment related to the payment request with the help of payment_request_id and payment_id using the $_GET global variable as shown below
try {
    $response = $api->paymentRequestPaymentStatus($_GET['payment_request_id'], $_GET['payment_id']);
    print_r($response);
}
catch (Exception $e) {
    print('Error: ' . $e->getMessage());
}
If you run the above code, you will get the buyer_name, amount, payment_id, payment_mode as instrument_type, transaction_status as status.
If the status is equal to credit then we will insert the above data in the database table we have created before and print the success message with the payment details to the success page as shown below.
<?php
try {
    $response = $api->paymentRequestPaymentStatus($_GET['payment_request_id'], $_GET['payment_id']);
    $buyer_name = $response['payment']['buyer_name'];
    $amount = $response['payment']['amount'];
    $payment_id = $response['payment']['payment_id'];
    $transaction_status = $response['payment']['status'];
    $payment_mode = $response['payment']['instrument_type'];

    if($response['payment']['status']=='Credit')
    {
        //echo 'Done';
        //insert the data in the database
        $sql="INSERT INTO instamojo_purchase(buyer_name,payment_id,amount,transaction_status,payment_mode)
            VALUES('$buyer_name','$payment_id','$amount','$transaction_status','$payment_mode')";
			$stmt=$con->prepare($sql);
			$stmt->execute();

	  if($stmt->rowCount()>0){

	  	 echo '<strong>Success!</strong>Your Order has placed successfully';
	  	 echo '<br>';
	  	 echo 'Payment ID:' .$payment_id.'<br>';
	  	 echo 'Buyer Name:' .$buyer_name.'<br>';
	  	 echo 'Amount:' .$amount.'<br>';
	  	 echo 'Transaction Status:' .$transaction_status;
	  }
    }
    else{

    	echo 'Failed';
    }
}
catch (Exception $e) {
    print('Error: ' . $e->getMessage());
}
?>
If the status is not equal to credit then we will echo ‘Failed’;
Conclusion:- I hope this tutorial will help you to understand the overview of Instamojo integration. If there is any doubt then please leave a comment below.