Hi friends, in this tutorial we will learn how to send mail in Laravel 8 using SMTP Gmail. As we all know that email sending in any web application or in a website plays an important role that is why I am going to discuss the step-by-step process from scratch so that anyone can integrate this functionality into their application.
By default, Laravel provides various mail services like postmark, mailgun and Amazon SES, etc. These are all API-based drivers which are very faster as compared to SMTP.
We can install these drivers via the composer package manager but it is very easy to build the email integration using Gmail SMTP. In order to do so, we have to follow the below steps one by one.
Required steps to send mail in laravel 8 using mail::send laravel
Step 1:- Create a project in Laravel 8.
If you don’t know how to create a Laravel project then follow the below tutorial
Step 2:- Set up the SMTP setting for Gmail in the .env configuration file as shown below
MAIL_MAILER=smtp
MAIL_HOST=smtp.gmail.com
MAIL_PORT=587
MAIL_USERNAME=your gmail id
MAIL_PASSWORD=your gmail password
MAIL_ENCRYPTION=tls
MAIL_FROM_ADDRESS=your gmail id
MAIL_FROM_NAME="${APP_NAME}"
Step 3:- Open the config\mail.php and set up the host and port in mailers array as shown below
'smtp' => [
            'transport' => 'smtp',
            'host' => env('MAIL_HOST', 'smtp.gmail.com'),
            'port' => env('MAIL_PORT', 587),
            'encryption' => env('MAIL_ENCRYPTION', 'tls'),
            'username' => env('MAIL_USERNAME'),
            'password' => env('MAIL_PASSWORD'),
            'timeout' => null,
            'auth_mode' => null,
        ],
Step 4:- Configure your Gmail settings to allow the access for incoming mails in your gmail as shown below
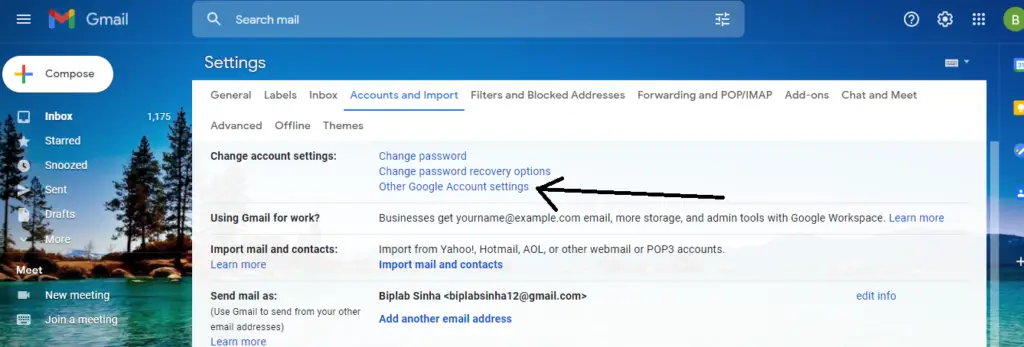
Step 5:- Click on the other Google Account Settings as shown on the above screenshot and go the page as shown below
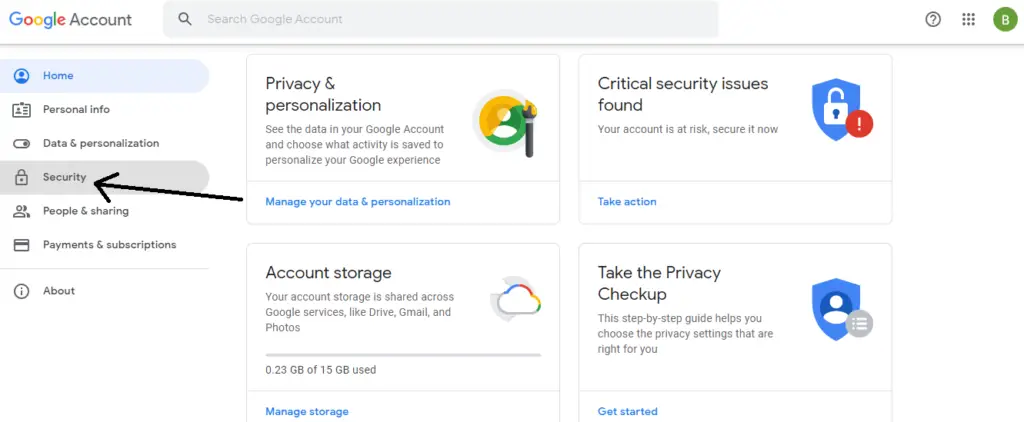
Step 6:- Now click on the Security tab and scroll down the page little bit and you can see the less secure app access tab as shown below
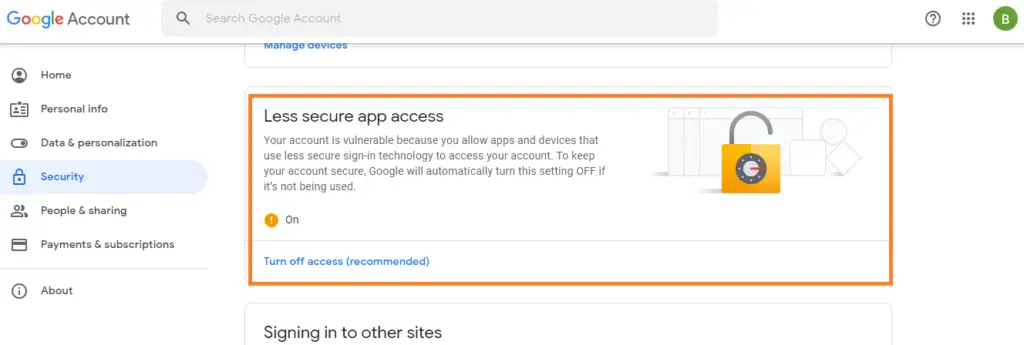
Step 7:- Now turn on the less secure app access tab. By default, this tab is turned off.
Step 8:- Create a mailable class.
In Laravel, each mail is sent through a mailable class that resides in the App\Mail directory of the project.
So, we have to build a mailable class with the help of the artisan command as shown below
php artisan make:mail EmailApp\Mail\Email.php
<?php
namespace App\Mail;
use Illuminate\Bus\Queueable;
use Illuminate\Contracts\Queue\ShouldQueue;
use Illuminate\Mail\Mailable;
use Illuminate\Queue\SerializesModels;

class Email extends Mailable
{
    use Queueable, SerializesModels;
    public $data;
    /**
     * Create a new message instance.
     *
     * @return void
     */
    public function __construct($data)
    {
        //
        $this->data = $data;
        $this->subject = $data['subject'];

    }

    /**
     * Build the message.
     *
     * @return $this
     */
    public function build()
    {
        return $this->subject($this->subject)->view('demomail')->with('data',$this->data);
    }
}
Step 9 :- Set up routes in the web.php file under the routes folder of the application.
Route::get('/mailsend',[App\Http\Controllers\MailController::class, 'mailsend']);
Route::post('/sendmail',[App\Http\Controllers\MailController::class, 'sendmail']);
the ‘/mailsend’ route indicates the blade file where our HTML form will be shown and we can fill up the information for sending mail.
the ‘/sendmail’ route is used to send the form data in the email and return the response back to the user in the HTML form with the success message if there is no error found.
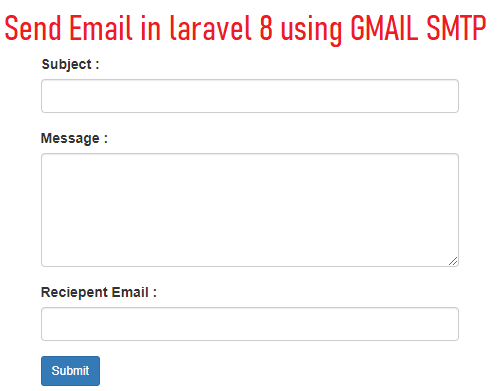
Step 10:- Create the blade file to fill up the email sending information as shown below
resources/views/mailsend.blade.php
<html>
<head>
<meta charset="utf-8">
<meta name="viewport" content="width=device-width, initial-scale=1">
<link rel="stylesheet" href="https://maxcdn.bootstrapcdn.com/bootstrap/3.4.1/css/bootstrap.min.css">
<style>
.container{
width:50%;
height:30%;
padding:20px;
}
</style>
</head>
<body>
<div class="container">
<br/><br/>
@if (Session::has('success'))
<div class="alert alert-info" id="al">{{ Session::get('success') }}
<button class="close" onclick="document.getElementById('al').style.display='none'" >&cross;</button>
</div>
@endif
<form action="/sendmail" method="post">
@csrf
<div class="row">
<div class="col-sm-8">
<div class="form-group">
<label for="name">Subject :</label>
<input type="text" class="form-control" name="subject">
</div>
<div class="form-group">
<label for="name">Message :</label>
<textarea name="message" class="form-control" cols="20" rows="5"></textarea>
</div>
<div class="form-group">
<label for="name">Reciepent Email :</label>
<input type="email" class="form-control" name="email">
</div>
<button type="submit" class="btn btn-primary btn-sm" name="save">Submit</button>
@if ($errors->any())
<div class="alert alert-danger">
<ul>
@foreach ($errors->all() as $error)
<li>{{ $error }}</li>
@endforeach
</ul>
</div>
@endif
</div>
</div>
</form>
</div>
<script src="https://ajax.googleapis.com/ajax/libs/jquery/3.5.1/jquery.min.js"></script>
<script src="https://maxcdn.bootstrapcdn.com/bootstrap/3.4.1/js/bootstrap.min.js"></script>
</body>
</html>
Step 11:- Create a controller
In this step, we will create a controller with the help of artisan command as shown below
php artisan make:controller MailControllerMailController.php
<?php
namespace App\Http\Controllers;
use Illuminate\Http\Request;
use App\Mail\Email;
use Mail;
use File;

class MailController extends Controller
{
    //
    public function mailsend(){

       return view('mailsend');

    }
    public function sendmail(Request $request){

      $request->validate([
                'subject'=> 'required',
                'message'=>'required',
                'email'=>'required',
               ]);
      //dd($request);
      $data = array(
        'subject' => $request->subject,
        'message'=> $request->message ,
         );
        Mail::to($request->email)->send(new Email($data));
        return back()->with('success', 'Sent Successfully !');

    }
}
After creating the controller, we will receive the form data in the sendmail() function and pass the data in the form of an array as an argument to the send() function by creating an object of the mailable class that exists in the App\Mail directory.
Step 12:- Modify the mailable class ( Email.php)
In this step, we will declare the array data with the public keyword inside the mailable class so that we can pass the data to the current constructor and use these data in the build function using the with() method to send in the email blade template which will be sent to the recipient’s email as the subject and the body.
Step 13:- Create an email blade template demomail.blade.php as shown below
demomail.blade.php
<html>
<head>
<meta charset="utf-8">
  <meta name="viewport" content="width=device-width, initial-scale=1">
  <link rel="stylesheet" href="https://maxcdn.bootstrapcdn.com/bootstrap/3.4.1/css/bootstrap.min.css">
<style>
.container{
	width:50%;
	height:30%;
	padding:20px;
}
</style>
</head>

<body>
	<div class="container">
		<div class="row">
		  <p>{{$data['message']}}</p>
		  <br><br>
		  <p><b>Regards,</b></p>
		  <p>Biplab Sinha</p>
		  <p>PHP Consultant</p>
		  <p>Indigi Consulting and Solutions Pvt Ltd</p>
		</div>
	</div>
<script src="https://ajax.googleapis.com/ajax/libs/jquery/3.5.1/jquery.min.js"></script>
<script src="https://maxcdn.bootstrapcdn.com/bootstrap/3.4.1/js/bootstrap.min.js"></script>

</body>
</html>
Step 14:- Now open the browser and hit the URL: https://127.0.0.1:8000/mailsend
Also read, Laravel 8 Autocomplete Search from the Database Using Ajax and Jquery
Conclusion:- I hope this tutorial will help you to understand the overview of laravel email sending. If there is any doubt then please leave a comment below