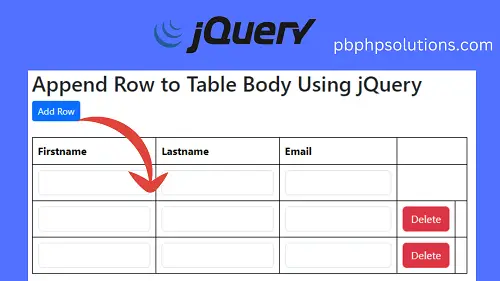
Hi friends, in this tutorial, you will learn how to append row to table body using jQuery in a straightforward way. Actually, there are many ways by which you can do this such as using javascript and passing ID values with the help of jQuery but I will explain a very simple approach to do this in a step-by-step.
Also read, How to use page loader jQuery
Required Steps to append row to table body using jQuery
Step 1:- Create an HTML file inside the root directory of your local server.
Step 2:- Now, paste the below code that contains a row with three columns such as first name, last name, and email.
index.html
<!DOCTYPE html>
<html lang="en">
<head>
  <title>Bootstrap Example</title>
  <meta charset="utf-8">
  <meta name="viewport" content="width=device-width, initial-scale=1">
  <link href="https://cdn.jsdelivr.net/npm/bootstrap@5.3.2/dist/css/bootstrap.min.css" rel="stylesheet">
  <script src="https://cdn.jsdelivr.net/npm/bootstrap@5.3.2/dist/js/bootstrap.bundle.min.js"></script>
</head>
<body>

<div class="container mt-3 w-50">
  <h2>Append Row to Table Body Using jQuery</h2>
  <!-- <p>The .table-bordered class adds borders on all sides of the table and the cells:</p>             -->
  <button type="button" class="btn btn-primary btn-sm" id="add_row">Add Row</button><br><br>
  <table class="table table-bordered" style="border:1px solid black;">
    <thead>
      <tr>
        <th>Firstname</th>
        <th>Lastname</th>
        <th>Email</th>
      </tr>
    </thead>
    <tbody>
      <tr>
        <td><input type="text" class="form-control" id="first_name" class="first_name"></td>
        <td><input type="text" class="form-control" id="last_name" class="last_name"></td>
        <td><input type="email" class="form-control" id="email" class="email"></td>
      </tr>
    </tbody>
  </table>
</div>
</body>
</html>
Step 3:- Now include the jQuery cdn link inside your HTML file before the body tag ends.
Step 4:- Now, paste the below jQuery code inside the script tags of your HTML file as given below.
<script src="https://ajax.googleapis.com/ajax/libs/jquery/3.7.1/jquery.min.js"></script>
<script>
  $(document).ready(function(){

    $('#add_row').click(function(){

      //$(tbody).find('tr').clone();
      var newrow = $('tbody').find('tr').first().clone();
      var del = '<td><button type="button" class="btn btn-danger delBtn">Delete</button><td>';
      var result = newrow.append(del);
      $('tbody').append(result);
    });

    //delete the row
    $('table').on('click','.delBtn',function(){

      //alert('ok');
      $(this).closest('tr').remove();

    });

  });
</script>
Explanation of the above code
- First of all, we will use an on-click event to the add row button as mentioned in the HTML file using the ID attribute.
- Now, we will find the first row of the table using tbody and clone that row. clone() will inherit all the elements and subelements of the selected row as given below.
$('tbody').find('tr').first().clone();
- Now we will assign the above piece of code to newrow variable and this will create a new row whenever you click on the add row button.
- Now it is time to put a delete button with the newly created row. To do this, we will define the delete element as given below.
var del = '<td><button type="button" class="btn btn-danger btn-sm delBtn">Delete</button></td>';
- Now we will append the above del variable to newrow variable so that when you create a new row and then delete button also comes with that row as shown below.
var result = newrow.append(del);
Please note that I have used a result variable that holds the complete newly created row
- Now, we will concatenate the result variable to the tbody element as given below because we are adding rows to the table body.
$('tbody').append(result);
- Now, after successfully addition of rows, it is time to delete the corresponding newly created row. To do this, we will use the closest() function of jQuery which helps to find the current row and delete that row as given below.
//delete the row
    $('table').on('click','.delBtn',function(){
      //alert('ok');
      $(this).closest('tr').remove();
    });
Complete Code:-
<!DOCTYPE html>
<html lang="en">
<head>
  <title>Bootstrap Example</title>
  <meta charset="utf-8">
  <meta name="viewport" content="width=device-width, initial-scale=1">
  <link href="https://cdn.jsdelivr.net/npm/bootstrap@5.3.2/dist/css/bootstrap.min.css" rel="stylesheet">
  <script src="https://cdn.jsdelivr.net/npm/bootstrap@5.3.2/dist/js/bootstrap.bundle.min.js"></script>
</head>
<body>

<div class="container mt-3 w-50">
  <h2>Append Row to Table Body Using jQuery</h2>
  <!-- <p>The .table-bordered class adds borders on all sides of the table and the cells:</p>             -->
  <button type="button" class="btn btn-primary btn-sm" id="add_row">Add Row</button><br><br>
  <table class="table table-bordered" style="border:1px solid black;">
    <thead>
      <tr>
        <th>Firstname</th>
        <th>Lastname</th>
        <th>Email</th>
      </tr>
    </thead>
    <tbody>
      <tr>
        <td><input type="text" class="form-control" id="first_name" class="first_name"></td>
        <td><input type="text" class="form-control" id="last_name" class="last_name"></td>
        <td><input type="email" class="form-control" id="email" class="email"></td>
      </tr>
    </tbody>
  </table>
</div>

<script src="https://ajax.googleapis.com/ajax/libs/jquery/3.7.1/jquery.min.js"></script>
<script>
  $(document).ready(function(){

    $('#add_row').click(function(){

      //$(tbody).find('tr').clone();
      var newrow = $('tbody').find('tr').first().clone();
      var del = '<td><button type="button" class="btn btn-danger delBtn">Delete</button><td>';
      var result = newrow.append(del);
      $('tbody').append(result);
    });

    //delete the row
    $('table').on('click','.delBtn',function(){

      //alert('ok');
      $(this).closest('tr').remove();

    });

  });
</script>

</body>
</html>
Conclusion:- I hope this tutorial will help you to understand the concept. If there is any doubt then please leave a comment below.