In this tutorial, we will learn how to import export excel file in laravel 8 using maatwebsite excel package.
Generally, we enter a small amount of data in the database manually from our application but sometimes we need to enter a large amount of data in the database then it is almost impossible to enter thousands of data in the database.
We can do it with the help of importing an excel file from the blade template of the file from our laravel application.
Required steps to import export excel file in laravel 8 application
Step 1:- Create a new project in laravel 8.
If you don’t know how to create a new project in laravel 8 then please follow the below link.
Step 2:- Configure the database as shown below
DB_CONNECTION=mysql
DB_HOST=127.0.0.1
DB_PORT=3306
DB_DATABASE=laravel
DB_USERNAME=root
DB_PASSWORD=
Step 3:- Create a table in the database to import the data in that table.
CREATE TABLE employee (id int(10) unsigned NOT NULL AUTO_INCREMENT,name varchar(255) COLLATE utf8mb4_unicode_ci DEFAULT NULL,age varchar(20) COLLATE utf8mb4_unicode_ci DEFAULT NULL,department varchar(255) COLLATE utf8mb4_unicode_ci DEFAULT NULL,created_at timestamp NOT NULL DEFAULT current_timestamp() ON UPDATE current_timestamp(),updated_at timestamp NOT NULL DEFAULT ‘0000-00-00 00:00:00’,
PRIMARY KEY (id)
) ENGINE=InnoDB AUTO_INCREMENT=3 DEFAULT CHARSET=utf8mb4 COLLATE=utf8mb4_unicode_ci
Step 4:- Now, install the maatwebsite/excel package using the command terminal as shown below
composer require maatwebsite/excel
Step 5:- Now, open the config/app.php which is located inside the config directory of the application and the service provider and aliase as shown below
'providers' => [
  Maatwebsite\Excel\ExcelServiceProvider::class,
 ],
 'aliases' => [
  'Excel' => Maatwebsite\Excel\Facades\Excel::class,
 ],
Step 6:- Now, publish the maatwebsite/excel package configuration by using the below command.
php artisan vendor:publish --provider="Maatwebsite\Excel\ExcelServiceProvider"
Step 7:- Now, create your routes in the routes/web.php file under the routes folder as shown below
//for import export
Route::get('/importexport',[App\Http\Controllers\ImportExportController::class, 'index']);
Route::post('/importxls',[App\Http\Controllers\ImportExportController::class, 'import_xls']);
Route::get('/exportxls',[App\Http\Controllers\ImportExportController::class, 'export_xls']);
Step 8:- Now, we have to create an import class under app\imports by using the below command in the command terminal as shown below
php artisan make:import EmployeeImport --model=Employee
here I am using Employee because my table name is employee. You can change as per your choice.
The above command will create an import class as app\Imports\EmployeeImport.php
add the below code in app\Imports\EmployeeImport.php
<?php
namespace App\Imports;
use App\Models\Employee;
use Maatwebsite\Excel\Concerns\ToModel;
use Maatwebsite\Excel\Concerns\WithHeadingRow;

class EmployeeImport implements ToModel, WithHeadingRow
{
    /**
    * @param array $row
    *
    * @return \Illuminate\Database\Eloquent\Model|null
    */
    public function model(array $row)
    {
        return new Employee([
            //
            'name'=>$row['name'],
            'age'=>$row['age'],
            'department'=>$row['department'],
        ]);
    }
}
Note:- WithHeadingRow is used if your excel file contains the header names for your column values.
Step 9:- Now, we have to create an export class under app\exports by using the below command in the command terminal as shown below
php artisan make:export EmployeeExport --model=Employee
Now, add the below code in app\Exports\EmployeeExport.php
<?php
namespace App\Exports;
use App\Models\Employee;
use Maatwebsite\Excel\Concerns\FromCollection;

class EmployeeExport implements FromCollection
{
    /**
    * @return \Illuminate\Support\Collection
    */
    public function collection()
    {
        return Employee::all();
    }
}
Step 10:- Now, create a controller by using the below command
php artisan make:controller ImportExportController
ImportExportController.php:-
<?php
namespace App\Http\Controllers;
use Illuminate\Http\Request;
use App\Models\Employee;
use App\Exports\EmployeeExport;
use App\Imports\EmployeeImport;
use Maatwebsite\Excel\Facades\Excel;

class ImportExportController extends Controller
{
    //
    public function index(){

        $data = Employee::all();

    	return view('importexportxls',compact('data'));
    }

    public function import_xls(Request $request){

    	$this->validate($request, [
	      'upload_xls'  => 'required|mimes:xls,xlsx'
	     ]);
        Excel::import(new EmployeeImport,$request->file('upload_xls'));


        return redirect('importexport')->with('status', 'Imported Successfully');
    }

    public function export_xls()
    {
        return Excel::download(new EmployeeExport, 'Employee.xlsx');
    }
}
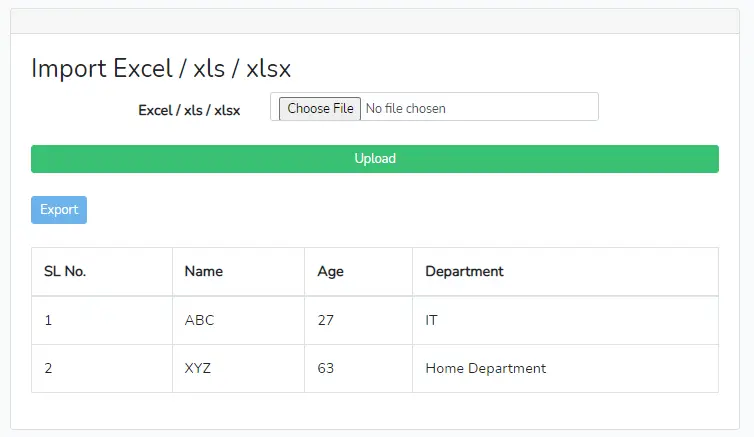
Step 11:- Now, create a blade file under the resources/views folder from where we can import the excel files.
importexportxls.blade.php:-
@extends('layouts.app')
@section('content')
<div class="container">
    <div class="row justify-content-center">
        <div class="col-md-8">
            <div class="card">
                <div class="card-header"></div>

                <div class="card-body">
                    @if (session('status'))
                        <div class="alert alert-success" role="alert">
                            {{ session('status') }}
                        </div>
                    @endif
                    <h3>Import Excel / xls / xlsx</h3>
           <form method="POST" action="/importxls" enctype="multipart/form-data">
                @csrf
                  <div class="form-group row">
                    <label for="Payslip" class="col-md-4 col-form-label text-md-right"><b>{{ __('Excel / xls / xlsx') }}</b></label>

                    <div class="col-md-6">
                        <input type="file" class="form-control form-control-sm" name="upload_xls" onchange="readURL(this);">

                        @if ($errors->has('upload_xls'))
                            <span class="invalid-feedback" role="alert">
                                <strong>{{ $errors->first('upload_payslip') }}</strong>
                            </span>
                        @endif
                    </div>
                </div>
              <button type="submit" class="btn btn-success btn-block btn-sm">{{ __('Upload') }}</button>
         </form>
      <br>
      <a href="/exportxls" class="btn btn-info btn-sm" style="color: white;">Export</a><br><br>
                   <div class="table-responsive">
                        <table id="example6" class="table table-bordered table-hover">
                          <thead>
                               <tr>
                                   <th>SL No.</th>
                                   <th>Name</th>
                                   <th>Age</th>
                                   <th>Department</th>
                                </tr>
                           </thead>
                          <tbody>
                         @foreach($data as $key=>$value)
                            <tr>
                              <td>{{$key+1}}</td>
                              <td>{{$value->name}}</td>
                              <td>{{$value->age}}</td>
                              <td>{{$value->department}}</td>
                            </tr>
                         @endforeach
                       </tbody>
                   </table>
                 </div>
                </div>
              </div>
            </div>
        </div>
    </div>
@endsection
Step 12:- Now, run the development server to start your laravel application by using the below command.
php artisan serve
Step 13:- Now, open your browser and hit the below URL to import the excel files( xls and xlsx ).
http://127.0.0.1:8000/importexport
Conclusion:- I hope this tutorial will help you to understand the import export excel file in laravel 8. If there is any doubt then please leave a comment below
Hi Dear, are you actually visiting this web site
on a regular basis, if so then you will definitely get fastidious know-how.
Hey I know this is off topic but I was wondering
if you knew of any widgets I could add to my blog that automatically tweet my newest twitter
updates. I’ve been looking for a plug-in like this for quite some
time and was hoping maybe you would have some experience with something like this.
Please let me know if you run into anything. I truly enjoy reading your blog and I look forward to your new
updates.
Hi Cortez, I am not using any tweet plugins like that but I can help you to set up the auto-tweet post. If you agree then send me an email.
Hello my friend! I want to say that this article is amazing, nice written and come
with almost all vital infos. I’d like to peer more posts like this .
I believe this is among the most vital info for me.
And i’m happy reading your article. But should commentary on few general things, The
website style is ideal, the articles is really excellent : D.
Good job, cheers
It’s an remarkable paragraph for all the web people; they
will take benefit from it I am sure.
Do you have any video of that? I’d care to find out some additional information.
I used to be suggested this blog by means of my cousin. I am no longer
positive whether this submit is written by means
of him as no one else realize such designated about my problem.
You are wonderful! Thanks!
Wow, that’s what I was seeking for, what a
material! existing here at this web site, thanks admin of this
web page.
I always used to read post in news papers but now as I am a user of web therefore from
now I am using net for content, thanks to web.
Greetings! This is my first comment here so I just wanted
to give a quick shout out and say I truly enjoy reading through
your articles. Can you recommend any other blogs/websites/forums that
cover the same topics? Thanks a lot!
Good blog post. I absolutely appreciate this
website. Thanks!
Wow, this paragraph is nice, my sister is analyzing these kinds of things, thus I am going
to inform her.
If some one wishes expert view about blogging and site-building
afterward i recommend him/her to visit this website, Keep up
the nice job.