Hi friends, in this tutorial you will learn how to Laravel Brevo Email Integration using API key, step by step. If you have ever struggled with Gmail SMTP setup — configuring ports, enabling two-factor authentication, generating a 16-digit app password, or dealing with “authentication failed” errors in your log files — then this guide is exactly for you.
If you want to try the SMTP approach instead, you can check my earlier tutorial on How to Send Email in Laravel Using Sendinblue
Why Choose Brevo API Key Over SMTP?
Most email service providers offer both SMTP and API key options, but SMTP comes with limitations — port blocking on shared hosting, IP restrictions, and daily sending caps that vary by provider.
I have previously covered How to Send Mail in Laravel 8 Using Gmail SMTP — if you prefer that approach, feel free to check it out. But if you face authentication issues, the API key method below is much cleaner.
After trying multiple providers, I found Brevo (formerly Sendinblue) to be the most reliable and developer-friendly option for transactional emails. Here is why I recommend it for Laravel Brevo Email Integration
- ✅ 300 free emails per day — sufficient for most development and small production use cases
- ✅ No Composer package required — I used cURL directly, keeping the implementation lightweight
- ✅ Simple API key authentication — no SMTP port headaches
- ✅ Real-time email logs available inside the Brevo dashboard
- ✅ CC support, HTML content, sender name customization — all built in
Now let us get started.
Step 1: Get Your Brevo API Key for Laravel Brevo Email Integration
- Visit https://www.brevo.com/ and create a free account
- Verify your account via the confirmation email sent to your mailbox
- After logging in, click on your profile icon at the top right → go to Settings
- In the left sidebar, click SMTP & API
- You will see two tabs — SMTP and API Keys & MCP — click on API Keys & MCP
- Click the Generate a New API Key button at the top right
- Give your key a name (e.g. “Laravel Project”) and click Generate
- Copy and save your API key immediately — Brevo will not show it again after you leave the page
💡 Tip: Brevo also provides official SDK documentation just below your generated key, available in PHP, Node.js, Python, and cURL. I used cURL in this tutorial for simplicity — no extra package installation needed.
Step 2: Configure Your Laravel .env File
Open your .env file and add the following variables:
BREVO_API_KEY=xkeysib-xxxxxxxxxxxxxxxxxxxxxxxxxxxxxxxx
BREVO_FROM_NAME="Your App Name"
BREVO_FROM_EMAIL=noreply@yourdomain.com
Important: Make sure BREVO_FROM_EMAIL is a verified sender in your Brevo account. You can verify it under Settings → Senders & IP.
Step 3: Complete Working Implementation
3.1 Create Migration
php artisan make:migration create_email_logs_table
Replace the migration content with:
use Illuminate\Database\Migrations\Migration;
use Illuminate\Database\Schema\Blueprint;
use Illuminate\Support\Facades\Schema;

return new class extends Migration
{
    public function up(): void
    {
        Schema::create('email_logs', function (Blueprint $table) {
            $table->id();
            $table->string('to');
            $table->string('subject');
            $table->longText('message');
            $table->timestamps();
        });
    }

    public function down(): void
    {
        Schema::dropIfExists('email_logs');
    }
};
Run the migration:
php artisan migrate
3.2 Create Model
app/Models/EmailLog.php
<?php

namespace App\Models;

use Illuminate\Database\Eloquent\Model;

class EmailLog extends Model
{
    protected $fillable = [
        'to',
        'subject',
        'message',
    ];
}
3.3 Create Controller
php artisan make:controller EmailController
app/Http/Controllers/EmailController.php
<?php

namespace App\Http\Controllers;

use Illuminate\Http\Request;
use App\Models\EmailLog;
use Illuminate\Support\Facades\Log;

class EmailController extends Controller
{
    public function index()
    {
        return view('email.index');
    }

    public function store(Request $request)
    {
        $request->validate([
            'to'      => 'required|email',
            'subject' => 'required|max:255',
            'message' => 'required',
        ]);

        EmailLog::create([
            'to'      => $request->to,
            'subject' => $request->subject,
            'message' => $request->message,
        ]);

        $this->sendBrevoMail(
            $request->to,
            '',
            $request->subject,
            $request->message
        );

        return redirect()->back()->with('success', 'Email sent successfully.');
    }

    private function sendBrevoMail($toEmail, $toName, $subject, $htmlContent, $ccEmails = [])
    {
        if (empty($toEmail)) {
            return false;
        }

        $payload = [
            "sender" => [
                "name"  => env('BREVO_FROM_NAME', 'My App'),
                "email" => env('BREVO_FROM_EMAIL', 'noreply@myapp.com')
            ],
            "to" => [
                [
                    "email" => $toEmail,
                    "name"  => $toName ?: 'User'
                ]
            ],
            "subject"     => $subject,
            "htmlContent" => $htmlContent
        ];

        if (!empty($ccEmails)) {
            $payload["cc"] = array_map(fn($cc) => ["email" => $cc], $ccEmails);
        }

        $ch = curl_init("https://api.brevo.com/v3/smtp/email");

        curl_setopt($ch, CURLOPT_RETURNTRANSFER, true);
        curl_setopt($ch, CURLOPT_POST, true);
        curl_setopt($ch, CURLOPT_HTTPHEADER, [
            "accept: application/json",
            "api-key: " . env('BREVO_API_KEY'),
            "content-type: application/json"
        ]);
        curl_setopt($ch, CURLOPT_POSTFIELDS, json_encode($payload));

        $response = curl_exec($ch);
        $error    = curl_error($ch);
        curl_close($ch);

        if ($error) {
            Log::error('Brevo Mail Error: ' . $error);
            return false;
        }

        Log::info('Brevo Mail Response: ' . $response);
        return true;
    }
}
3.4 Define Routes
routes/web.php
use App\Http\Controllers\EmailController;
Route::get('/email', [EmailController::class, 'index'])->name('email.index');
Route::post('/email', [EmailController::class, 'store'])->name('email.store');
3.5 Create Blade View
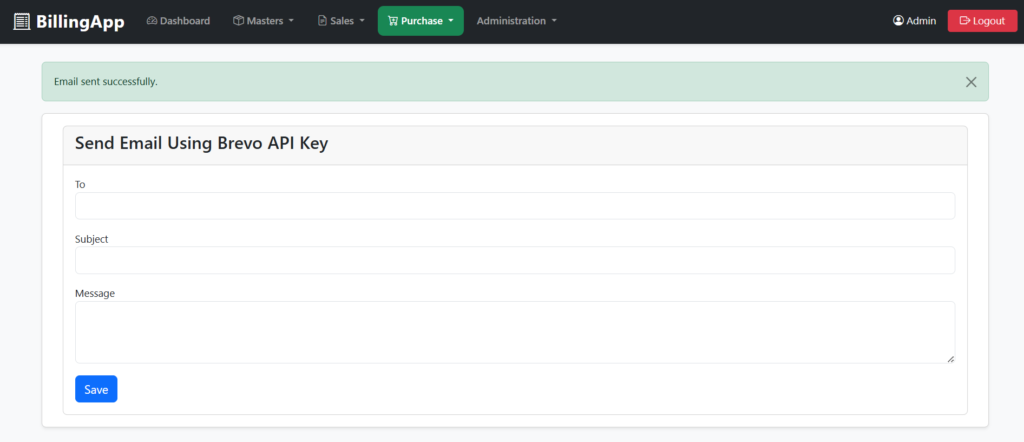
resources/views/email/index.blade.php
@extends('layouts.app')

@section('title', 'Send Email')

@section('content')
<div class="container">
    <div class="card">
        <div class="card-header">
            <h4>Send Email via Brevo</h4>
        </div>
        <div class="card-body">

            @if(session('success'))
                <div class="alert alert-success">
                    {{ session('success') }}
                </div>
            @endif

            <form action="{{ route('email.store') }}" method="POST">
                @csrf

                <div class="mb-3">
                    <label>To</label>
                    <input type="email" name="to"
                           class="form-control @error('to') is-invalid @enderror"
                           value="{{ old('to') }}" required>
                    @error('to')<div class="invalid-feedback">{{ $message }}</div>@enderror
                </div>

                <div class="mb-3">
                    <label>Subject</label>
                    <input type="text" name="subject"
                           class="form-control @error('subject') is-invalid @enderror"
                           value="{{ old('subject') }}" required>
                    @error('subject')<div class="invalid-feedback">{{ $message }}</div>@enderror
                </div>

                <div class="mb-3">
                    <label>Message</label>
                    <textarea name="message" rows="8"
                              class="form-control @error('message') is-invalid @enderror"
                              required>{{ old('message') }}</textarea>
                    @error('message')<div class="invalid-feedback">{{ $message }}</div>@enderror
                </div>

                <button type="submit" class="btn btn-primary">Send Email</button>
            </form>

        </div>
    </div>
</div>
@endsection
Step 4: Common Error — “Authentication Not Found in Headers”
This is the most common error beginners face with Brevo API. Here is the exact error message you will see in your storage/logs/laravel.log:
[2026-07-01 15:40:42] local.INFO: Brevo Mail Response:
{"message":"authentication not found in headers","code":"unauthorized"}
Why this happens: Your API key is either incorrect, missing from .env, or your current IP address has not been authorized in your Brevo account.
How to fix it:
When you make your first API call from a new IP address, Brevo sends a security email to your registered address that looks like this:
“Someone tried to use your organization account and make an API call with an IP address you have never used before.”
Simply open that email and click “Yes, authorize the new IP address.” It will redirect you to your Brevo account under Settings → Security → Authorized IPs where your IP will be added automatically.
💡 Note: You only need to do this once per IP address. If you deploy to a new server or your IP changes, you may need to authorize again.
Step 5: Brevo Free Plan Limit
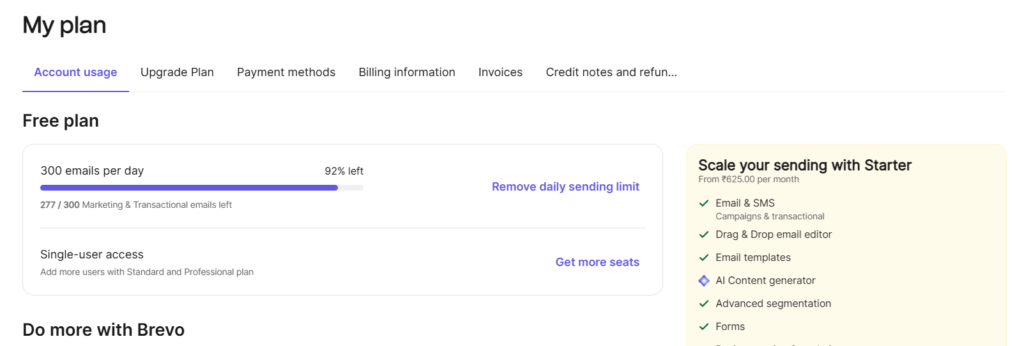
Brevo’s free plan includes 300 emails per day with full API access — no credit card required. For most development projects and small applications, this is more than enough to get started.
If you need more volume, Brevo’s paid plans start at $9/month for 5,000 emails, billed per email sent rather than per contact stored — making it cost-effective as your app scales.
Frequently Asked Questions
Q: Do I need to install any Composer package for Brevo in Laravel?
No. This tutorial uses cURL directly, so no additional package installation is required. Just add your API key to .env and use the sendBrevoMail method shown above.
If you are working on a plain PHP project without Laravel, check my guide on How to Send Email in PHP with Example using PHPMailer and Gmail SMTP.
Q: What is the difference between Brevo API key and SMTP key?
These are two different credentials. The API key (starts with xkeysib-) is used for direct REST API calls as shown in this tutorial. The SMTP key is used when you configure Brevo as an SMTP relay in your .env file (MAIL_HOST, MAIL_PASSWORD etc.). Do not mix them up.
Q: Can I send CC emails using this method?
Yes. Pass an array of CC email addresses to the $ccEmails parameter in the sendBrevoMail function. The implementation is already included in the code above.
Q: Will this work on shared hosting?
Yes, as long as your hosting provider allows outbound cURL requests (most do). No special server configuration is needed.
Conclusion
I hope this tutorial helped you understand how to integrate Brevo email in Laravel using an API key without any Composer package. This approach is clean, lightweight, and works reliably across shared hosting and VPS environments. The IP authorization step is a one-time security requirement that Brevo enforces to protect your account — once done, emails will flow smoothly.
If you are building a complete billing or eCommerce system in Laravel, you might also find my guide on Razorpay Payment Gateway Integration in PHP useful alongside email integration.
If you have any questions or run into any errors not covered here, drop a comment below and I will help you out.