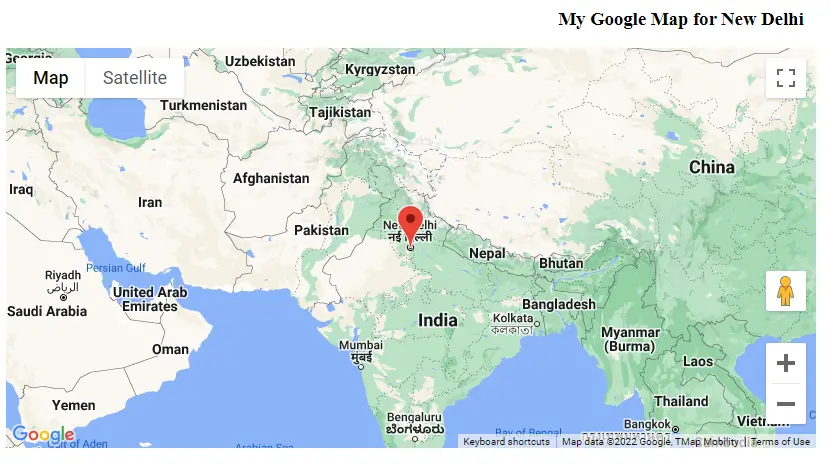
Hello friends, in this tutorial I will explain step by step with an example of how to add google map to website with a marker. This is a very important part of website development because everyone wants to embed Google Maps on their sites so that users or visitors can navigate to their desired locations by zooming on the map.

Before getting started with the example, make sure that you have the basic knowledge of HTML, CSS, and JavaScript.
Also read, Get user location from the browser using JavaScript and Geolocation API
Required steps to add Google map to website with marker
Step 1:- Create an HTML page as shown below
<!DOCTYPE html>
<html>
  <head>
    <title>Add Map</title>
    <link rel="stylesheet" type="text/css">
  </head>
  <body>
    <h3 align="center">My Google Map for New Delhi</h3>
    <!--The div element for the map -->
    <div id="map"></div>
  </body>
</html>
Understand the above code:-
- Declare a div tag to display the area of the map on the web page.
Step 2:- Get an API key from Google Cloud Console
Step 3:- Design the map using CSS inside the style tag under the head section as shown below.
<style type="text/css">
      #map {
            height: 400px;
            /* The height is 400 pixels */
            width: 60%;
            /* The width is the width of the web page */
          }
</style>
In the CSS part, I have set the size of the map using height and width
Step 4:- Add a map with a marker using javascript.
<!-- Async script executes immediately and must be after any DOM elements used in callback. -->
    <script src="https://maps.googleapis.com/maps/api/js?key=your api key&callback=initMap&v=weekly"
      async
    ></script>
    <script type="text/javascript">
      // Initialize and add the map
          function initMap() {
            // The location of delhi
            const delhi = { lat: 28.644800, lng: 77.216721 };
            // The map, centered at delhi
            const map = new google.maps.Map(document.getElementById("map"), {
              zoom: 4,
              center: delhi,
            });
            // The marker, positioned at delhi
            const marker = new google.maps.Marker({
              position: delhi,
              map: map,
            });
          }
    </script>
Understand the code:-
- First of all, we will load the maps javascript API using the script tag as shown below. The callback parameter will execute the initMap() function that will add a map to your page later.
- The initMap() function initializes and adds the google map to your web page for your desired location when the web page loads.
- The Below code creates a new Google map object and sets the center and zoom property for the location you want to display. You have to set the latitude and longitude of your location. The more you set the zoom property, you can view the earth’s locations at higher resolutions.
// The location of Delhi
            const delhi = { lat: 28.644800, lng: 77.216721 };
            // The map, centered at Delhi
            const map = new google.maps.Map(document.getElementById("map"), {
              zoom: 4,
              center: delhi,
            });
- The below code will display the marker for your location on the Google map at the centered position.
// The marker, positioned at delhi
            const marker = new google.maps.Marker({
              position: delhi,
              map: map,
     });
Complete Code:-
<!DOCTYPE html>
<html>
  <head>
    <title>Add Map</title>

    <link rel="stylesheet" type="text/css">
    <style type="text/css">
      #map {
            height: 400px;
            /* The height is 400 pixels */
            width: 60%;
            /* The width is the width of the web page */
          }
    </style>
  </head>
  <body>
    <h3 align="center">My Google Map for New Delhi</h3>
    <!--The div element for the map -->
    <div id="map"></div>

    <!-- Async script executes immediately and must be after any DOM elements used in callback. -->
    <script
      src="https://maps.googleapis.com/maps/api/js?key=your api key&callback=initMap&v=weekly"
      async
    ></script>
    <script type="text/javascript">
      // Initialize and add the map
          function initMap() {
            // The location of Delhi
            const delhi = { lat: 28.644800, lng: 77.216721 };
            // The map, centered at Delhi
            const map = new google.maps.Map(document.getElementById("map"), {
              zoom: 4,
              center: delhi,
            });
            // The marker, positioned at Delhi
            const marker = new google.maps.Marker({
              position: delhi,
              map: map,
            });
          }
    </script>
  </body>
</html>
Google places autocomplete example using maps JavaScript API
Conclusion:- I hope this tutorial will help you to understand the overview of positioning the Google map with a marker. If there is any doubt then please leave a comment below